How To: Install Ghost onto Oracle Cloud Free Tier


BitmapBytes.com uses the Oracle Cloud to host this blog - in a 6 part series I will be taking you through how you can quickly and easily spin up a website with 200gb of free space hosted on the Oracle Cloud. Connect it with your domain with https support, setup the domain with free email service for 5 emails provided by ZOHO mail - and finally install the Ghost blogging platform and configuring it with Mailgun for sending out newsletters to your followers.
- Part 1 - Setting up an account with Oracle Cloud
- Part 2 - Spinning up an Oracle Virtual Machine
- Part 3 - Configuring your Oracle Virtual Machine as a webserver
- Part 4 - Install Ghost CMS
- Part 5 - Setup free email provider
- Part 6 - Configure Mailgun
Hookup a domain to your VM.
First lets connect the domain and point it to our Oracle Cloud Virtual Machine - ghost needs this and cannot be setup against your VM IP.
I'm using 123-reg.co.uk but the process is pretty much the same for all domain registrars.
Launch your domain DNS Manager and update or add if they are not defined the "A" name records for "@" and "www" with the IP of your VM.
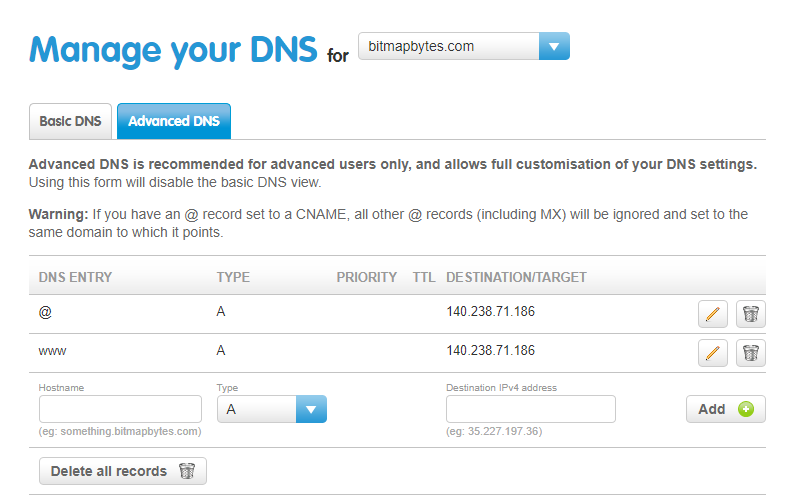
Once done if you're lucky you should be able to load up your domain in a browser and it will launch and show you the NGINX placeholder page - otherwise you may need to wait 24hrs.
VM Setup
You should have NGINX, MySQL or MariaDB & Nodejs installed as part of the previous steps.
DB Setup
Lets configure a DB User on MySQL for the Ghost CMS.
# Launch MySQL
sudo mysql

# Create DB User with PW
create user 'ghost'@'localhost' identified by 'Password1234';

# Grant full priviledges
grant all privileges on *.* to 'ghost'@'localhost';

# Create ghost DB
create database ghost;

# Finally flush
flush priviliges;

# Exit MySql
exit
Install Ghost-CLI
This will let us quickly install ghost as well as access quick commands to restart service setup SSL etc.
# Install the Ghost CLI
sudo npm install ghost-cli@latest -g
Install Ghost
We'll create a new folder in our webserver path and install ghost.
# Create directory ghost
sudo mkdir -p /var/www/ghost

# Set directory owner
sudo chown ubuntu:ubuntu /var/www/ghost

# Set the correct permissions
sudo chmod 775 /var/www/ghost

# Then navigate into it
cd /var/www/ghost

# initiate the install cmd
ghost install
Install questions
During the install the CLI will ask a few configuration questions
- Blog URL
This is your VM Domain ie https://bitmapbytes.com
- Don't worry we will configure SSL/https later.. and skip adding www we'll set this up later as well. - MySQL hostname
Leave as localhost - you do get 2 VMs if you wanted..
You could setup the second VM just for your DB - MySQL username / password
This is the user / pass you configured earlier - Ghost database name
This is the DB name you configured earlier - Set up NGINX?
Yes, let ghost configure the webserver for you.. Do you really want to do this manually.. you can always go back end edit or review what ghost did later.. - Set up SSL?
Yes, lets make life easy and let Ghost do the hard work and setup SSL for free using Let's Encrypt - we will also configure this for www later as this is not done as part of this process. - Set up systemd?
Yes, this is the process manager that makes sure everything is running smoothly. - Start Ghost?
Yes, lets get this up and running and test it out..
ghost setup to restart the configuration process.ghost setup ssl and it all worked fine.www. not working?
www is considered as a secondary domain and not setup as part of the install - so lets go ahead and set that up.
Back in your terminal add the following replacing mydomain with your canonical base domain you defined for Ghost -
# Determine your secondary URL (primary domain with www.)
ghost config url https://www.mydomain.com

# Get Ghost-CLI to generate an SSL setup for you:
ghost setup nginx ssl

# Change your config back to your canonical domain
ghost config url https://mydomain.com

# Edit the nginx config files for your second domain to redirect to your canonical domain. In both files replace the content of the first location block with:
# return 301 https://mydomain.com$request_uri;
cd /etc/nginx/sites-available/
Update the two www. files like this-
- www.mydomain.com.conf
- www.mydomain.com-ssl.conf
server {
    listen 80;
    listen [::]:80;

    server_name www.mydomain.com;
    root /var/www/bitmapbytes/system/nginx-root; # Used for acme.sh SSL verification (https://acme.sh)

    location / {
return 301 https://mydomain.com$request_uri;# Get nginx to verify your config
sudo nginx -t
# Reload nginx with your new config
sudo nginx -s reloadCongratulations that's it!
Now if you access your domain you should see the base Ghost Site! To setup and start posting and configuring to the CMS head to https://mydomain.com/ghost/ to register an admin account and login.